Week 1
Here is a summary of what we hope to accomplish our first meeting:
- Meet and greet
- Summary of the build
- Q&A about materials, timing, etc
- Certifications for new people on table saw/drill press/band saw
- Partnering up for now
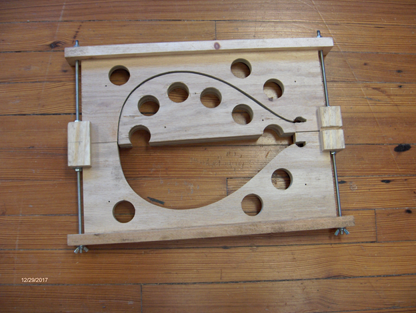
- Mould (jig) build-should look like this when done
- Any extra time-making sanding jigs for top/bottom radius
- Clean-up

Materials needed for this jig
–2 pieces of 3/4 plywood 6″ by 15″
–2 pieces of 1 x 4 18″ long
–some 1 1/4 screws to put it together
–a piece of 2 x 4 about 8 ” long
–2 all threads 16″ long
–4 screws for the all thread (wing nuts best)
–a piece of 2 x 4 about 18” long (radius sanding jig)
Week 2
Friday we’ll work on a couple different things to minimize bottlenecks at tools. I propose you break up into groups of 2 and work together on the same task. Here’s what we’ll work on and what you will need.
Sides – we’ll cut and dimension the 2 side pieces to 2” tall x .085” thick x 18” long.
Bend the sides to shape using a heated pipe.
Bring a heat gun if you have one. We’ll have a few so not to worry if you don’t have one.
Bring a spray bottle for wetting the sides while bending
Bring (2) 2” wide x 20” long strips of aluminum to aid in bending the sides if you have anything available. I have several made from scraps of gutter that we can use so don’t go out and buy anything.
Top and back – we’ll join the top pieces and back pieces. Final dimension 11” wide x 15” long
Neck – we’ll use either a solid block or glue a sandwich of 3 pieces for a neck with final dimension of 16” long x 2” wide x2.5” tall
Material needed:
Back and sides to match – I suggest one of the following: Mahogany, Walnut, Maple, Cherry
Top – Spruce (we have enough spruce from an old piano soundboard that you are welcomed to use)
Neck – We should have enough mahogany if you want to use it otherwise I suggest maple
