
Category Archives: Education
Mandolin Project
Week 1
Here is a summary of what we hope to accomplish our first meeting:
- Meet and greet
- Summary of the build
- Q&A about materials, timing, etc
- Certifications for new people on table saw/drill press/band saw
- Partnering up for now
- Mould (jig) build-should look like this when done
- Any extra time-making sanding jigs for top/bottom radius
- Clean-up
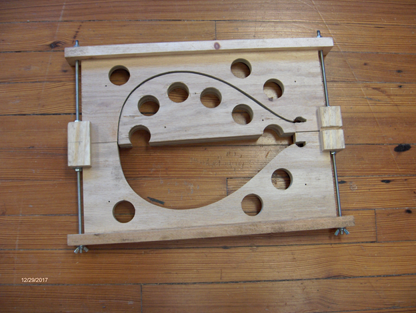
Materials needed for this jig
–2 pieces of 3/4 plywood 6″ by 15″
–2 pieces of 1 x 4 18″ long
–some 1 1/4 screws to put it together
–a piece of 2 x 4 about 8 ” long
–2 all threads 16″ long
–4 screws for the all thread (wing nuts best)
–a piece of 2 x 4 about 18” long (radius sanding jig)
Week 2
Friday we’ll work on a couple different things to minimize bottlenecks at tools. I propose you break up into groups of 2 and work together on the same task. Here’s what we’ll work on and what you will need.
Sides – we’ll cut and dimension the 2 side pieces to 2” tall x .085” thick x 18” long.
Bend the sides to shape using a heated pipe.
Bring a heat gun if you have one. We’ll have a few so not to worry if you don’t have one.
Bring a spray bottle for wetting the sides while bending
Bring (2) 2” wide x 20” long strips of aluminum to aid in bending the sides if you have anything available. I have several made from scraps of gutter that we can use so don’t go out and buy anything.
Top and back – we’ll join the top pieces and back pieces. Final dimension 11” wide x 15” long
Neck – we’ll use either a solid block or glue a sandwich of 3 pieces for a neck with final dimension of 16” long x 2” wide x2.5” tall
Material needed:
Back and sides to match – I suggest one of the following: Mahogany, Walnut, Maple, Cherry
Top – Spruce (we have enough spruce from an old piano soundboard that you are welcomed to use)
Neck – We should have enough mahogany if you want to use it otherwise I suggest maple
Luthier Group kicks off mandolin project.
Our first Mandolin Class was a Big success!
We had 6 students, and 2 others who just had to miss the first class, making a total of 8.
We also had 2 other brand new guild members who joined, due to hearing about the class, but didn’t feel ready to take the class.
Ken did an awesome job as the Friday night supervisor, as he had 5 new Guild members to certify on several tools.
Thanks Ken for all the help and support!


2017 Habitat Cabinet Build Class Completes Construction
Habitat Home for the Holidays Cabinet Construction Complete!
The final workshop session for the Habitat Cabinet Build Class is now history. Students learned the tips and techniques for using Jigs and Templates to install drawer slides, pull out shelves, doors and external hardware pulls.
Once again our friends and partners at HGH Hardware Supply came through with a generous donation of premium hardware products which made the installation so much better to achieve. It was a long but satisfying day to see the efforts of the past several months come to together with such great looking cabinets!
The final session for the students and instructors will be the in-home installation of the cabinets in early December. Many thanks to the AWG Students and Volunteer Instructors for your time, dedication and skills to bring this year’s project home!
Be sure to check out the ABC 33/40 coverage of the Home for the Holidays news segments later in November and early December!
[metaslider id=2277]
2016 Habitat for Humanity Cabinet Class Off and Running
This year’s Habitat for Humanity Cabinet Class kicked off Saturday the 27th at the Woodworkers Education Center in Maylene. The first session included a basic orientation and review of the proposed plans then off to the shop floor to begin work on the Red Oak, Cabinet Face Frames. Lead by Bob Moore and Randall Robertson, the class divided up into two teams and learned how to cut the dado joint on the face frame to fit the cabinet carcass. The rails and stiles are joined with pocket hole screws then sanded smooth in preparation of the next session: Carcass construction scheduled for Saturday, September 10th.
There is still time to catch up with the remainder of the class if you are interested in learning cabinet making.
[metaslider id=227]
Dining Table Class for H4H Holiday House
This year we are adding another class for the H4H Holiday House. The 40″ x 72″ trestle is a Paul Sellers design. The Thursday evening Hand Tool Class is making this same table and six chairs using tools. The table was on display at the August meeting. The maximum class size is six. there are four already signed up for the class leaving two openings. The table will be made of red oak and we will learn selection and stock preparation using the joiner and the thickness planer and  table saw. There will be a large table top glue up, we will make mortices using the hollow chisel morticing machine and we will cut tenons on the table saw. There is also dovetails cut in the table apron.
The class will be on Thursdays from 9:00am until 3:30 pm. The schedule is 9/8/16, 9/22/16, 10/6/16, 10/20/16, and 11/3/16 if necessary.
The class fee is $85 and you must be a member to attend.